Cara Instalasi Openshift di Gio Public
0 people liked this article
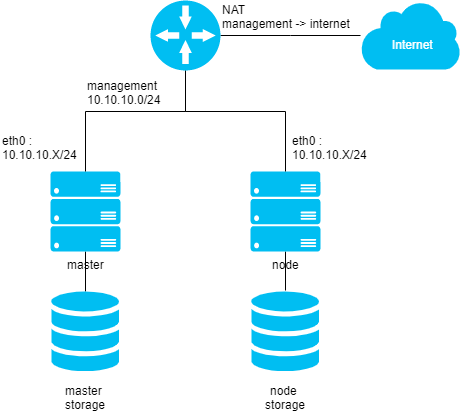
Pada panduan kali ini kita akan menginstal openshift dengan topologi berikut.

Setup environtment
Untuk setup pertama buat 2 VM dengan OS CentOS 7 yang diinstall dari ISO

A. Instal dan konfigurasi DNSmasq di host master
- Instal paket dnsmasq
# yum -y install dnsmasq
- Buat file Openshift.conf
# vi /etc/dnsmasq.d/openshift.conf
strict-order
domain-needed
local=/giostaging.com
bind-dynamic
log-querie
address=/.okd.giostaging.com/10.10.10.100
Note: Untuk giostaging.com dan okd.giostaging.com silakan disesuaikan dengan domain/subdomain yang diinginkan. Sedangkan untuk 10.10.10.100 merupakan IP Private host master
- Tambahkan ke file /etc/hosts
# vi /etc/hosts
…
10.10.10.100 okd.giostaging.com okd
10.10.10.200 node.giostaging.com node
- Tambahkan DNS resolver ke /etc/resolv.conf
# vi /etc/resolv.conf
…
nameserver 10.10.10.100
- Edit file dnsmasq.conf
<i># vi /etc/dnsmasq.conf
...
listen-address=10.10.10.100 #IP private host master
...
server=8.8.8.8</i>
# systemctl enable dnsmasq
# systemctl start dnsmasq
# systemctl status dnsmasq
- Install dan tambahkan rule iptables untuk service DNS
# yum install -y iptables-services
# systemctl enable iptables
# systemctl start iptables
# systemctl status iptables
# iptables -I INPUT 1 -p TCP --dport 53 -j ACCEPT
# iptables -I INPUT 1 -p UDP --dport 53 -j ACCEPT
# iptables-save > /etc/sysconfig/iptables
- Tambahkan resolv.conf ke folder /etc/origin/node/
# mkdir -p /etc/origin/node
# touch /etc/origin/node/resolv.conf
B. Instal dan konfigurasi DNSmasq di host node
- Instal paket dnsmasq
# yum -y install dnsmasq
- Tambahkan IP host master di konfigurasi dnsmasq.conf
# vi /etc/dnsmasq.conf
...
server=10.10.10.100 #IP private host master
- Tambahkan IP host master sebagai DNS resolver ke /etc/resolv.conf
# vi /etc/resolv.conf
...
nameserver 10.10.10.100
# systemctl enable dnsmasq
# systemctl start dnsmasq
# systemctl status dnsmasq
- Tambahkan resolv.conf ke folder /etc/origin/node/
# mkdir -p /etc/origin/node
# touch /etc/origin/node/resolv.conf
C. Konfigurasi di masing-masing host
- Disable firewalld
# systemctl stop firewalld
# systemctl disable firewalld
# systemctl status firewalld
- Instal dan konfigurasi NetworkManager
# yum install -y NetworkManager
# vi /etc/NetworkManager/NetworkManager.conf
...
[main]
dns=none
# systemctl enable NetworkManager
# systemctl start NetworkManager
# systemctl status NetworkManager
- Konfigurasi SELINUX=enforcing & SELINUXTYPE=targeted
# vi /etc/selinux/config
...
# This file controls the state of SELinux on the system.
# SELINUX= can take one of these three values:
#     enforcing - SELinux security policy is enforced.
#     permissive - SELinux prints warnings instead of enforcing.
#     disabled - No SELinux policy is loaded.
SELINUX= enforcing
# SELINUXTYPE= can take one of these two values:
#     targeted - Targeted processes are protected,
#     minimum - Modification of targeted policy. Only selected processes are protected.
#     mls - Multi Level Security protection.
SELINUXTYPE=targeted
- Konfigurasi PATH
# vi ~/.bash_profile
...
<i>export PATH=$PATH:/bin:/sbin:/usr/bin:/usr/sbin</i>
# source ~/.bash_profiles
- Install paket utilities dan EPEL repositori
# yum install -y wget git net-tools bind-utils iptables-services bridge-utils
bash-completion curl vim openssl
# yum -y install https://dl.fedoraproject.org/pub/epel/epel-release-latest-7.noarch.rpm
# sed -i -e "s/^enabled=1/enabled=0/" /etc/yum.repos.d/epel.repo
- Update paket dan restart VM
# yum -y update
# reboot
- Instal docker dan konfigurasi docker storage
# yum install -y docker
Untuk docker storage, gunakan data volume tambahan yang sudah di-attach ke masing-masing host master dan node.
# fdisk -l
...
<i>Disk /dev/sdb: 32.2 GB, 32212254720 bytes, 62914560 sectors
<i>Units = sectors of 1 * 512 = 512 bytes
<i>Sector size (logical/physical): 512 bytes / 512 bytes
<i>I/O size (minimum/optimal): 512 bytes / 512 bytes</i></i></i></i>
# vgcreate docker-vg /dev/
(untuk /dev/sdb disesuaikan dengan hasil output dari command fdisk -l sebelumnya)
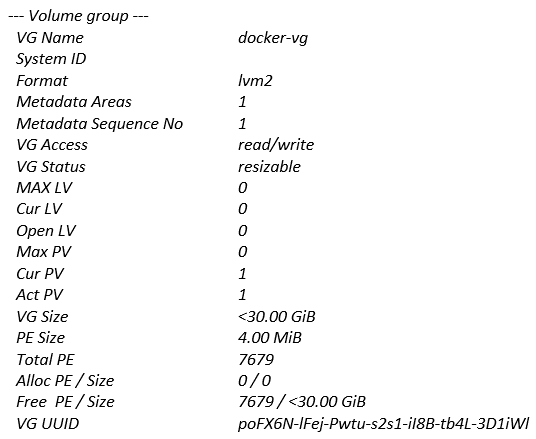
# vgdisplay

# vi /etc/sysconfig/docker-storage-setup
…
VG=docker-vg
# docker-storage-setup
Note : untuk docker storage di sini masih belum di set persistent storage nya. Silakan dilakukan pengaturan sesuai kebutuhan untuk persistent storage.
D. Install dan konfigurasi Openshift di host master
- Instal Ansible versi 2.6
Download Ansible versi 2.6 menggunakan command berikut
# wget https://releases.ansible.com/ansible/rpm/release/epel-7-x86_64/ansible-2.6.0-1.el7.ans.noarch.rpm
# wget https://releases.ansible.com/ansible/rpm/release/epel-7-x86_64/ansible-2.6.0-1.el7.ans.src.rpm
Jalankan perintah berikut untuk instalasi Ansible versi 2.6
# yum -y install python-paramiko python-six python2-cryptography sshpass python-jinja2 pyOpenSSL
# rpm -Uvh ansible-2.6.0-1.el7.ans.*
- Edit konfigurasi ansible di file /etc/ansible/hosts seperti berikut
# vi /etc/ansible/hosts
...
[OSEv3:children]

masters
nodes
etcd
# Set variables common for all OSEv3 hosts
[OSEv3:vars]
# SSH user, this user should allow ssh based auth without requiring a password
ansible_ssh_user=root
# If ansible_ssh_user is not root, ansible_become must be set to true
#ansible_become=true
openshift_deployment_type=origin
# uncomment the following to enable htpasswd authentication; defaults to DenyAllPasswordIdentityProvider
openshift_master_identity_providers=[{'name':'htpasswd_auth', 'login': 'true', 'challenge': 'true', 'kind':'HTPasswdPasswordIdentityProvider', 'filename':'/etc/origin/master/htpasswd'}]
openshift_master_default_subdomain=okd.giostaging.com
openshift_docker_insecure_registries=172.30.10.0/16


openshift_disable_check = memory_availability,disk_availability

# host group for masters
[masters]
okd.giostaging.com openshift_schedulable=true containerized=false openshift_hostname= okd.giostaging.com
openshift_public_hostname= okd.giostaging.com openshift_public_ip= 103.44.27.209 #IP public host master
# host group for etcd
[etcd]
okd.giostaging.com

# host group for nodes, includes region info


[nodes]

okd.giostaging.com openshift_node_labels="{'region': 'infra', 'zone': 'default'}"
node.giostaging.com openshift_node_labels="{'region': 'primary', 'zone': 'east'}" openshift_schedulable=true
openshift_hostname= node.giostaging.com openshift_public_hostname= node.giostaging.com
openshift_public_ip=103.58.100.150 #IP public host node- Clone repository openshift/openshift-ansible versi 3.9
# git clone -b release-3.9 https://github.com/openshift/openshift-ansible
# cd openshift-ansible
- Jalankan perintah berikut untuk install openshift
Harap diperhatikan sebelum menjalankan command berikut, pastikan bahwa host master bisa ssh tanpa password ke host master dan host node
# ansible-playbook playbooks/prerequisites.yml
Note : tunggu proses tersebut sampai selesai dan pastikan tidak ada error/failed. Kemudian jalankan command berikut
# ansible-playbook playbooks/deploy_cluster.yml
- Clone repository openshift/openshift-ansible versi 3.9
# git clone -b release-3.9 https://github.com/openshift/openshift-ansible
# cd openshift-ansible
- Jalankan perintah berikut untuk install openshift
Harap diperhatikan sebelum menjalankan command berikut, pastikan bahwa host master bisa ssh tanpa password ke host master dan host node
# ansible-playbook playbooks/prerequisites.yml
Note : tunggu proses tersebut sampai selesai dan pastikan tidak ada error/failed. Kemudian jalankan command berikut
# ansible-playbook playbooks/deploy_cluster.yml
E. Verifikasi cluster yang sudah terinstal di host master
- List nodes
# oc get nodes
...
<i>NAME                 STATUS  ROLES   </i><i>AGE  VERSION</i>
<i>node.giostaging.com  Ready   compute 6m</i><i>v  1.9.1+a0ce1bc657
<i>okd.giostaging.com   Ready</i><i>   master</i><i>  6mv  1.9.1+a0ce1bc657</i></i>
- Buat user untuk login ke dashboard openshift
# htpasswd /etc/origin/master/htpasswd admin
...
<i>New password: </i><i>your_strong_password</i>
<i>Re-type new password: </i><i>your_strong_password</i>
<i>Adding password for user admin</i>
- Login openshift melalui CLI
# oc login
...
Authentication required for https://okd.giostaging.com:8443 (openshift)
Username: admin
Password:
Login successful.
You don't have any projects. You can try to create a new project, by running
oc new-project <projectname>- Login ke dashboard openshift
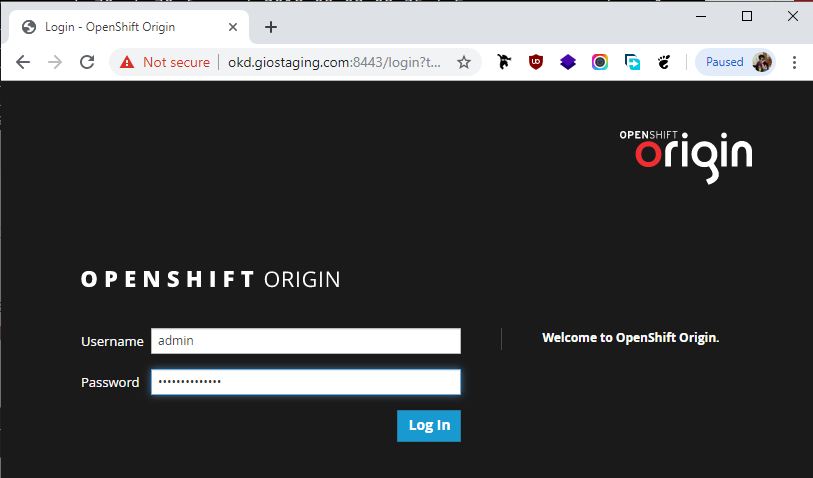
Buka URL https://hostname_master:8443 kemudian masukkan username dan password yang dibuat sebelumnya

- Halaman dashboard openshift setelah berhasil login

Popular Articles
-
Cara Install & Konfigurasi Monitoring Cacti Serta Mengetahui Fungsi Fitur Pada Cacti
10 people say this guide was helpful
-
Cara Mengaktifkan Telnet pada Windows 7, 8 dan 10
4 people say this guide was helpful
-
Install dan Konfigurasi Samba Server pada Ubuntu
3 people say this guide was helpful
-
Jenis-Jenis Software Virtualisasi untuk Membuat Virtual Machine
6 people say this guide was helpful